• Skip to primary navigation
  • Skip to main content
  • Skip to footer
Margret E. Short Fine Arts

Margret E. Short Fine Arts

Portland, Oregon artist Margret Short - a modern day master of 17th Century Dutch art using the chiaroscuro technique to create still life and floral paintings.

  • Home
  • About
    • Margret E Short Bio
    • Resumé
    • Artist’s Statement
    • Artist Resources
    • The Lessons Series
    • Oregon Honor
  • Commission
  • Prints
  • Events
  • Galleries
  • Projects
    • Quintessential Blue
    • Iso-LACE-tion: A Thirty Day Painting Project
    • Indigenous Naturals Project
    • Lessons from the Spider Woman
    • Girl Jazz Singers
    • Lessons from the Pharaoh’s Tomb, Part 1
    • Lessons from the Pharaoh’s Tomb, Part 2
    • Lessons from the Low Countries
    • Greek Pigment Project
  • Contact
  • Blog

Priming Canvases Part #2

December 24, 2008 by Margret Short

Several readers asked more questions about the steps following the rabbit skin glue application during the process of priming linen.

After the glue has dried, usually 24 hours is a good bet, I sand the surface of the linen very lightly with a fine grit sandpaper block. If you run the palm of your hand over the surface, you will feel the rough threads that lift and dry during the sizing process. You just need to knock these off with the sanding. Afterward, run your palm over the surface and you will feel when it is smooth and the roughness is gone.

Using a step down knife you will now be able to prime the linen. Many different products are excellent for this process. I use lead primer so I always wear protective gloves. I prefer the primer from Robert Doak but there are other excellent ones also such as Utrecht.

Primer&stepdown knife 

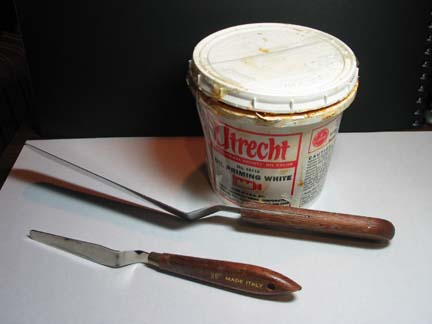
The primer is very thick as it comes from the container, like a thick paste, which is OK. The theory is to scrape on a very thin layer just to cover the surface and fill the interstices of the linen's texture. The step down knife is very useful here because the primer will glide smoothly across the surface and your fingers will be protected from the goop.

Remember two or three thin layers are way better than one thick layer. I keep scraping all the excess off and putting it back in the can, so it never gets too thick. After the entire surface is covered, lay the canvas flat and let it dry for several days. I always do one more layer and let the canvas cure for at least 2 to 3 weeks. At this point, I paint on some kind of low oil color like burnt or raw umber, let this dry, and then it is ready to use.

Does any one else have a favorite technique or product?

Tagged With: burnt umber, linen, priming, raw umber, Robert Doak, step down knife, Utrecht

Chiaroscuro Painting

Oil painting with the chiaroscuro technique illuminates the focus area with a strong light. All other areas are painted with less detail, lower values, and intensity of color giving a mysterious appearance. By putting one or two objects in the important focus area, a strong but simple composition will emerge. Combining these oil painting techniques with a selection of superior natural pigments and oil paints result in the beautiful and evocative quality known as Chiaroscuro Painting.

Reader Interactions

Comments

  1. Fakhra says

    April 1, 2009 at 7:26 am

    Nice post. Thanks for shairing that

Footer

Sign up for Margret’s Newsletter

Join Margret while she explores imagery and pigments used since 3500 BC!

Email Address:

Recent Blogs

Doing the Mazurka with Emma Sandys

Adelaide Labille-Guiard; Folkdancing Backwards

The Queen of Capri Waltzed Backwards in Button Boots: Sophie Gengembre Anderson

Dancing the Rigaudon Backwards: Rachel Ruysch

Dancing Backwards with Elisabetta Sirani: 1638-1665

[More Blog Posts]

  • Instagram
  • LinkedIn
  • Pinterest
  • RSS

Looking for Something Special?

© 2006 - © 2025 Margret E Short, all rights reserved